Ultrasound Guided Vascular Access
Ultrasound guided vascular access. Overview of the process and procedure with top tips for success
Pre-reading
1. Prepare equipment and Positioning
- Equipment: Ultrasound Machine, Alcohol-Chlorhexidine Swabstick, Sterile Probe Cover Kit, Paper towels, IV Access equipment, Sterile gloves
- Positioning: Ultrasound machine positioned in front of user on same or opposite side, equipment nearby and accessible on trolley
2. Use Ultrasound Machine to identify suitable vein (Non-Sterile Scout)
- Linear Probe, low depth
- Using regular bottled Ultrasound gel
- “Mow the Lawn” looking for vein with suitable size, depth and trajectory
- E.g. cephalic, basilic, median cubital, brachial vein
3. Wipe Down Ultrasound Probe and Patient Skin
- Wipe down ultrasound probe with Clinell Wipes
- Wipe patient skin with paper towel
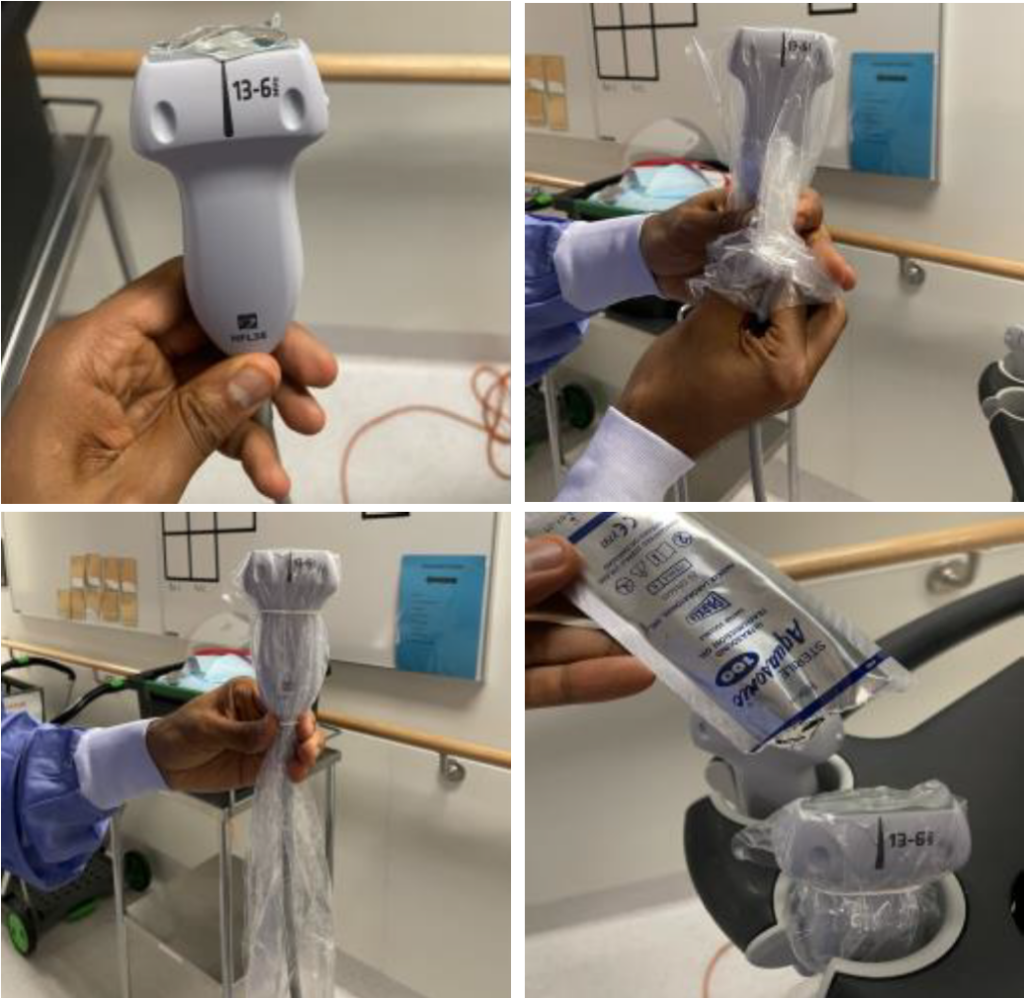
5. Cover the Ultrasound Probe with Sterile Probe Cover
- Use non-touch technique on probe end surface throughout
- Open sterile gel sachet- put layer of gel over probe end surface
- Pull sterile cover over probe and cable Use rubber bands to secure cover onto probe
- Put second layer of sterile gel over probe end surface
6. Perform Out-Of-Plane Peripheral Vascular Access Technique
- Orientate right-left on the Ultrasound display
- Use longer cannula for deeper veins (>5mm depth)
- Introduce needle at 30 degrees to skin, 5-10mm away from Ultrasound probe
- Look at display
- Pull probe back towards you until you see the needle tip
- Slide the probe forwards until the needle tip disappears
- Advance the needle carefully until the needle tip re-appears
- Once in the vein, reduce the angle of needle entry
- Continue to advance needle at least 5mm while focussing on keeping needle in central of vein
- Advance cannula, pull out needle and secure cannula
- Confirm position by aspirating blood, or by using the US machine to check in-plane cannula position or saline flush
7. Disinfection
- Wipe away excess gel from patient with paper towel
- Remove Ultrasound Sterile Probe Cover
- Gently wipe away gel on probe cover with paper towel Wipe down Ultrasound Probe and Cable with Clinell wipes
Top Tips
Keep probe perpendicular to needle to best see the tip
Try to keep your eyes looking at the display
Don’t move the needle if you can see the needle tip!
Use small sharp movements to enter the vein, not a continuous push
Use centre line function to help assess trajectory of vein
For Central IV Access- same technique to get into the vein applies with full sterility of: personal protective equipment, surfaces and equipment.
References and Further reading
- Bendigo ED Resource PDF – US guided vascular access
[cite]

POCUS
made easy
MBChB FACEM CCPU. Emergency Physician at Bendigo Hospital and Royal Melbourne Hospital, Victoria. Australia.
I studied in Scotland before completing my Emergency Medicine training in Melbourne. I have a big interest in point-of-care ultrasound use and training in Emergency Medicine. I'm also interested in Choosing Wisely and sustainability initiatives in healthcare.
In my free time you'll find me playing tennis and soccer, or heading outdoors on camping trips.


