![]()
Abdominal CT: Windows basics
Changing the window settings
Many practitioners regularly review radiology images but are unfamiliar with the basic tools that allow them to extract the most information from the images.
One of the most important tools to learn when using a PACS viewer is changing the window settings. These settings can be adjusted, allowing you to see all of the important structures that have been captured in the image.
Each window setting is defined by specific numbers in Hounsfield units. Put simply, each radiology image has more information than can be shown in a single grey scale image. Changing the window settings allows you to shift the grey scale range so you can completely evaluate all important structures in an image. You can think of this as viewing the same image through different lenses, where each lens allows you to see different structures in better detail.
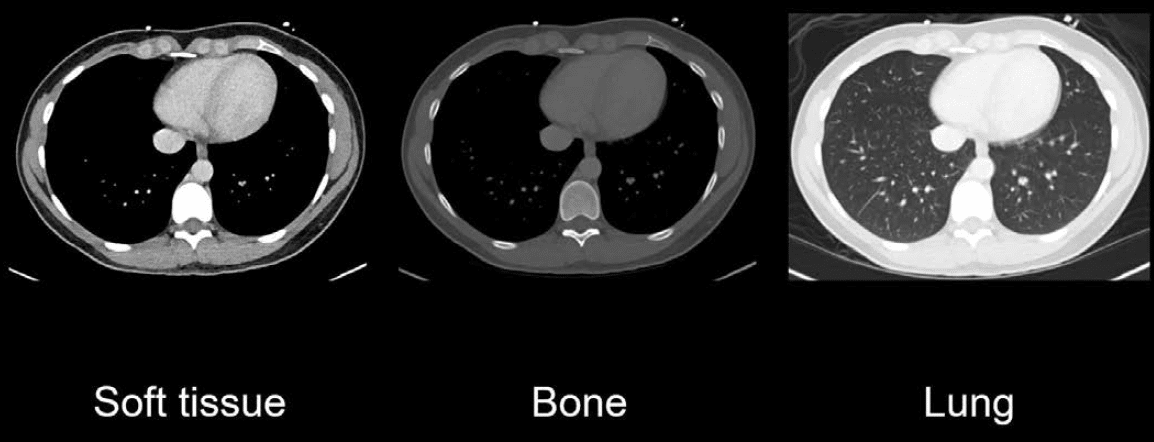
Changing the window settings is more than just adjusting the brightness of the image. It changes which structures you see best. Below, the soft tissue, bone, and lung windows have been applied to the same axial CT image.
Soft tissue window
The most common window setting you will use is the soft tissue setting. The soft tissue window is best for reviewing solid organs and vasculature. In the following images, we can see the heart, liver, aorta, and major vessels.
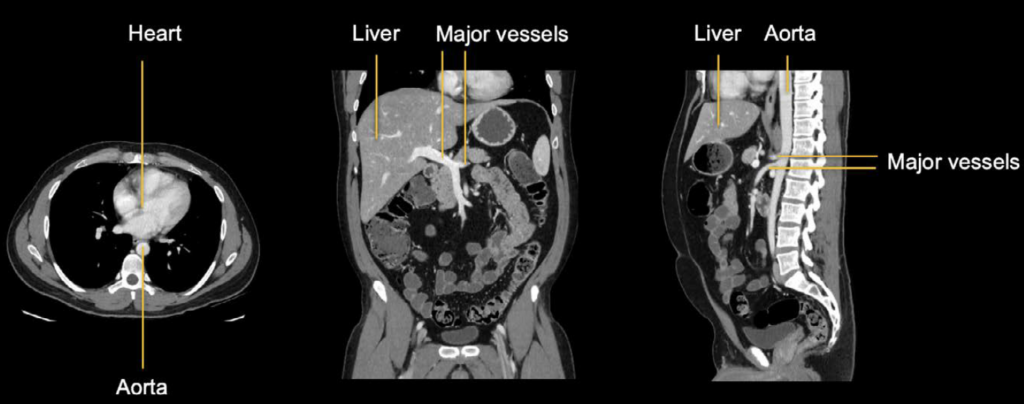
However, there are two major structures that we cannot see well with this setting
- We cannot see the lungs at all, and we only see a little bit of the pulmonary vasculature.
- Also, it is hard to evaluate the bones because they are too bright.

Lung window
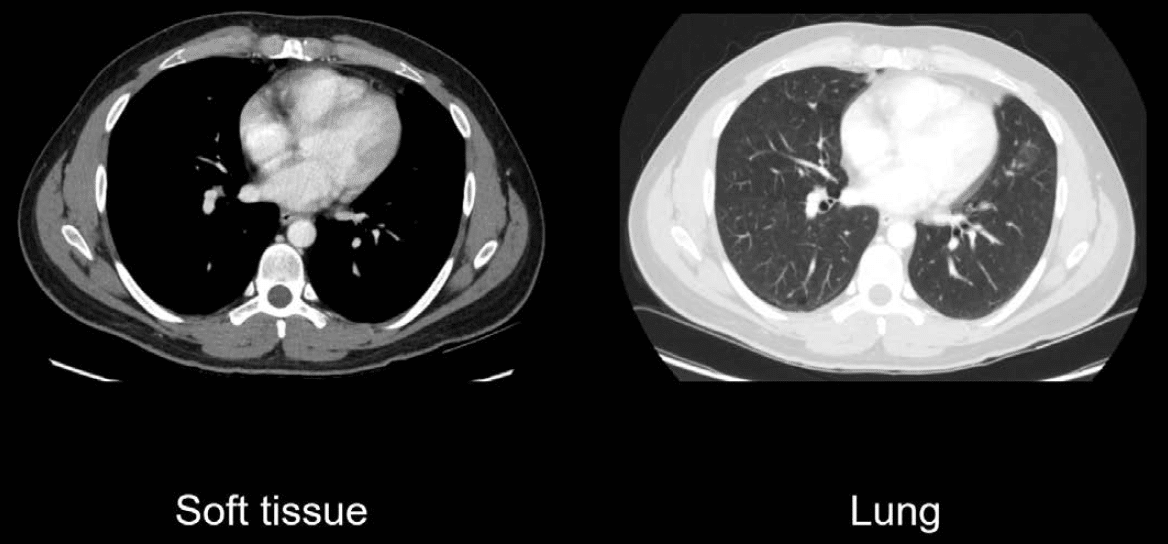
Changing the window setting alters the grey scale values. In the image below on the left, we have the soft tissue window. On the right, we’ve changed our lens to allow us to see the lungs. Notice how the lung window allows us to see the lung tissue, but we can no longer see the detail of the heart as well as all structures outside of the lungs, which appear white and blended together.
Bone window
Similarly, in the soft tissue window, bone is too bright to evaluate. When we change our lens to the bone window, we can see the bone structure and anatomy of the spine in more detail, but now the non-bone structures appear washed out compared to the soft tissue window.

Each window setting has trade-offs when it comes to which structures are best visualised, but all combined they provide a complete picture of the patient’s anatomy to help you make the diagnosis.
This is an edited excerpt from the Medmastery course Abdominal CT Essentials by Michael P. Hartung, MD. Acknowledgement and attribution to Medmastery for providing course transcripts.
- Hartung MP. Abdominal CT: Common Pathologies. Medmastery
- Hartung MP. Abdominal CT: Essentials. Medmastery
- Hartung MP. Abdomen CT: Trauma. Medmastery
References
- Top 100 CT scan quiz. LITFL
Radiology Library: Abdominal CT Basics
- Hartung MP. What is the role of Abdominal CT? LITFL
- Hartung MP. Abdominal CT: Basics. LITFL
- Hartung MP. Abdominal CT: Common Terms. LITFL
- Hartung MP. Abdominal CT: Planes. LITFL
- Hartung MP. Abdominal CT: Measuring attenuation. LITFL
- Hartung MP. Abdominal CT: Windows settings (basics). LITFL
- Hartung MP. Abdominal CT: Windows settings (advanced). LITFL
Abdominal CT interpretation

Assistant Professor of Abdominal Imaging and Intervention at the University of Wisconsin Madison School of Medicine and Public Health. Interests include resident and medical student education, incorporating the latest technology for teaching radiology. I am also active as a volunteer teleradiologist for hospitals in Peru and Kenya. | Medmastery | Radiopaedia | Website | Twitter | LinkedIn | Scopus

MBChB (hons), BMedSci - University of Edinburgh. Living the good life in emergency medicine down under. Interested in medical imaging and physiology. Love hiking, cycling and the great outdoors.